This product uses high-performance chips, high-definition video, seamless dynamic picture. Through the European CE, American FCC's rigorous certification, support FHD1080P true full HD video. Please read this manual carefully before using and keep it, and we hope that this product will meet your needs and long-term service to you!
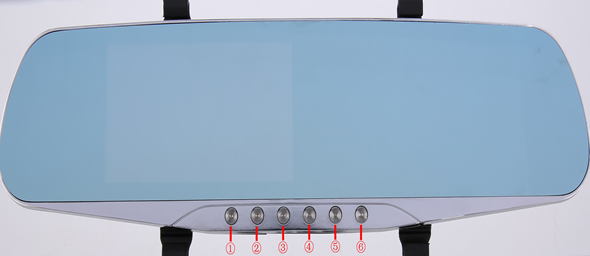
First, the appearance and key functional description
1. Power button / camera lights
2. Menu key
3. Mode key / lock key emergency recording
4. turn the key / footage switching / rewind
5. turn key / mute button / fast forward / stop monitoring
6. Enter / video key / camera button / playback button / motion detection
1. Power button / camera lights
Function one: switch function
In shutdown mode, press [] and hold the power button for 3 seconds to turn the unit off, the machine automatically start working. In the boot mode, press [] and the power button for 3 seconds and the unit automatically save video files and user settings and shut down.
Two functions: camera fill light function
In standby mode, press the power button [] can fill light on / off / auto switch three modes, the automatic mode, the brightness of the fill light from the camera sensor to control light.
2. Menu key
Function: Menu function
In standby mode, press [Menu] button to enter the main menu function to set the table, press the down arrow key [] or [Down] keys to select the desired option settings, press [OK] button to confirm. After setting, press [Menu] key until you exit the menu setting function. (Menu setting method in video mode, camera mode, playback mode are the same)
3. Mode key / lock key emergency recording
Features a: mode switching function
In standby mode, press the [mode] button to switch between different modes (video / camera / playback).
Function two: emergency locking function
In the video mode, if you want to protect the current video will not be overwritten, press the [mode] button to activate the emergency lock function, the screen icon in the lower right appears a lock file, 10 seconds before and after the time of the accident will save 20 seconds for a particular image, the image will not be overwritten.
4. turn the key / footage switching / rewind
Function one: the flip function
In the menu settings and playback mode Press [key] to turn on the feature page.
Function two: camera switching function
After access after external camera, dual camera automatically displays. Under the video mode, short press the [key] can be turned on the front camera, rear camera, PIP, split screen to switch between the four display; camera mode, press [] key to switch on the turn before the camera, after the camera.
Three functions: rewind
In playback mode, during playback of the video, short press the [key] on the turn can rewind.
5. turn key / mute button / fast forward / stop monitoring
Function one: next page function
In the menu settings and playback mode for the next flip function.
Function two: Turn off the recording function
In the video mode, short press the [Down] button to turn off the recording function, the screen changes to prohibit the bottom right of the microphone icon, said that it has closed the recording function. Press again to turn the recording, the recording icon is open.
Three functions: fast forward
In Playback mode, press [Down] keys to fast forward.
Function Four: Stop Monitoring
In standby mode, press [Down] keys to open or close the parking monitoring, there will be a corresponding change in the lower left corner icon.
6. Enter / video key / camera button / playback button / motion detection
Function One: Enter
In the state recording standby mode / camera mode / playback mode; enter the menu mode, press [on the turn key / Down] keys to browse, press [Enter] to be determined.
Function two: enable / disable recording function
In the video mode, press [Enter] to start recording again press [Enter] to stop recording.
Three functions: camera button
In camera mode, press [ENTER] once to take a picture.
Four functions: file playback button
In the file browser mode, press [Enter] to play the video.
Five functions: Motion Detection
In standby mode, press [Enter] to switch to motion detection mode. Press [Enter] to exit the motion detection mode.
Second, the installation guide
1. Turn off the car engine.
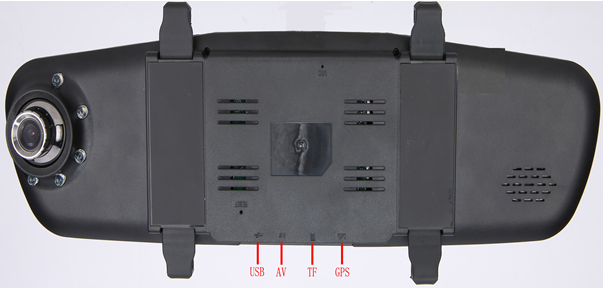
2. Insert the TF card into the recorder slot.
[Note] Please use the high-speed TF card (Class6 above), capacity of not less than 512MB, TF card maximum support 32GB.
3. The recorder is fixed on the car's original rearview mirror.
4. The car charger into the car cigarette lighter.
5. Use an extension cord to charge the recorder's USB port and car charger connected.
[Note] may be charged when wiring to extend the line laid along the edge of the windshield.
6. The rear camera installed in the rear of the vehicle, pay attention to the direction of the installation. Wiring can be laid along the roof of the vehicle. After completion of the installation will plug into the recorder rear camera interface.
7. Adjust the lens position to ensure that the camera is level with the ground.
8. start the engine and check that the machine has been installed correctly.
[Note] When the machine is installed correctly, the system indicator lights work; the machine starts to enter the recording status, video flashes. Remember to check on the display screen is normal, if the display is rather like, please do not hesitate to contact us.
Third, Features
1. Use the automatic recording function
Start the car engine, the recorder automatically starts to open the recording function, the charge indicator lights, video flashes. Turn off your vehicle engine, the recorder automatically saved recordings and shut down. Image segmentation record keeping on TF card, TF card memory is full when the recorder will overwrite earlier after the recorded images. Time record of self in the menu settings, ranging from 2 minutes / 3 minutes / 5 minutes / off four stalls.
[Pay attention]
If selected as a "2/3/5" minutes in any of these three files to a file, when TF card memory is full after the recorder will overwrite the images recorded earlier.;
b. If you select "Off", places 10 minutes to save a file, will not continue recording when the card is full.
before c., after the video camera are stored in the TF card "DCIMA" and "DCIMB" folder.
2. Use the manual recording functions
Press the power button recorder [] 3 seconds, the recorder automatically starts and start recording, video recording indicator lights up and blinks. To shut down the power button long press [] 3 seconds, the recorder will automatically save the record again and shut down.
3. Using the camera
In the boot mode, short press the [mode] key to enter the camera mode, the screen icon top left corner of the camera has been converted into a camera, press [Enter] to take pictures. To switch back to the recording mode, press the [mode] key twice.
4. Use the motion detection function
In standby mode, press the [key] on the turn into the motion detection mode. When the lens is sensitive to a moving object, the state machine into the camera when the lens does not feel 5 seconds after the object moves, the system stops recording. To exit the motion detection mode, when not recording long press on the turn button for 3 seconds to exit the motion detection mode.
5. collision sensing
The built-collision sensor (G-sensor), if a serious vehicle collision, the recorder will be locked 10 seconds before and 20 seconds after the accident occurred and save it as a particular image, while the bottom left of the display screen lock icon. The image is not locked loop coverage.
[Note] a. Lock the beginning of the video file named ZW, common log file for the beginning of the AW.
b. a collision sensor (G-sensor) sensitivity adjustment support, according to the actual need to change the settings on their own in the setup menu.
6. a key lock function
The machine has a key lock function, will need to retain images without being locked loop coverage. In the video mode, short press before the [Menu] button, the recorder will be 10 seconds and 20 seconds after the image is locked.
7. Date and time settings
In standby mode press [Menu] button to enter the System Setup menu, press the down arrow key [] / [Down] keys to move the cursor to set the date options. Press [Enter] to enter the menu settings.
[Note] In order to effectively record the date and time of the traffic accidents forensics, before using the machine, set the correct date and time.
8. a key mute function
In working condition, press [Down] key, the screen changes to prohibit the bottom left of the microphone icon, indicating that the video recording feature is turned off, then the recorder only records the image without recording sound. Short again press the [Down] keys below the screen turns recording microphone icon, indicating recovery recording.
[Note] settings are saved automatically after boot again without setting a mute function.
9. U disk mode
The data logger is connected via computer USB interface cable, the screen displays the disk, camera, charging three selectable modes. Press the down arrow key [] / [Down] keys to select the disk option, and then press [Enter] to enter the U disk mode.
10. Shooting file playback
Boot state short press the [mode] key twice to switch to playback mode. Press the down arrow key [] / [Down] keys to find the file you want to playback, press [Enter] to play. Exit playback mode, then press the [mode] key can be.
11. GPS function
The machine is turned on, the GPS port GPS module is not inserted or poor contact case, GPS icon is not displayed. If the GPS module is properly inserted into the GPS port, GPS icon will be grayed out, and began to get location information. In about a minute to get outdoors to location information. When the GPS icon displays green when GPS positioning success, then simply open the video function, walking tracks GPS will be saved to a file.
[Note] GPS MAP file format.
12. reversing visual
First, you must connect the recorder car charger, cable to connect the camera head down black red lights. Car charger plug the machine will automatically start recording status, in any state, if there is reverse, reverse image will be displayed. After reversing visual machine automatically returns to the recording mode. In reversing the image state, use the arrow key [] / [Down] keys to adjust the position of the reference line, adjust the finish will be preserved.
13. Stop Monitoring
When you open parking monitoring functions, in the off state, if the car has a slight vibration, then the recorder will automatically start recording, then turn off if it is in the state will be recorded in 20 seconds and then shut down (time can be set in the automatic shutdown function ). [Note] This feature requires hardware support.
Fourth, product specifications
Built-in image sensor 120W
Rear camera resolution of 1280 × 720
Camera angle 120 degrees
Video Resolution 1080P (FHD1920x1080),
720P (HD1280x720),
VGA (640 × 480)
Camera resolution 1M (1280x960),
2M (1600x1200),
3M (2048x1536)
Storage Compression H.264
MAP GPS track format
MOV video format
Image Format JPEG
Storage temperature -30 ℃ ~ 70 ℃
Operating temperature 0 ℃ ~ 50 ℃
Operating humidity 15-65% RH
Memory card capacity up to 32GB
Standard voltage DC12V

 China:
Shenzhen
Shanghai
Chengdu
Beijing
Guangzhou
China:
Shenzhen
Shanghai
Chengdu
Beijing
Guangzhou
 United States:
New York
Glasgow
California City
Washington
United States:
New York
Glasgow
California City
Washington
 Canada:
Montreal
Baie-d'urfe
Ottawa
Canada:
Montreal
Baie-d'urfe
Ottawa
 France:
Bezons
Ostwald
Paris
France:
Bezons
Ostwald
Paris
 Japan:
Kitanagoya
Fukuoka
Yokohama
Tokyo
Japan:
Kitanagoya
Fukuoka
Yokohama
Tokyo
 Russia:
Samara
Kaliningrad
Moscow
Russia:
Samara
Kaliningrad
Moscow
 Sweden:
Norrkping
Stockholm
Kvissleby
Sweden:
Norrkping
Stockholm
Kvissleby
 United Kingdom:
Manchester
Bourton
United Kingdom:
Manchester
Bourton